If your shutter speed and aperture are already fixed, raise ISO when it gives useful shadow improvement without sacrificing highlight detail you need. Keep ISO lower and brighten the RAW file later when further amplification brings little improvement, or when retaining bright detail matters more than the shadow penalty.
The catch is knowing which comparison you are making. A photograph taken with less light and a photograph recorded at a different ISO are not the same experiment.
Keep the light comparison honest
At fixed scene brightness, aperture and shutter speed, raising ISO does not collect additional light. The sensor receives the same exposure; changing ISO changes how that captured signal is handled. In the linear model used by Hasinoff, Durand and Freeman, collected signal depends on light level and exposure time, while gain affects its recorded value.
Imagine a moving subject for which you have chosen 1/500 second and f/2.8. These are illustrative settings, not test photographs:
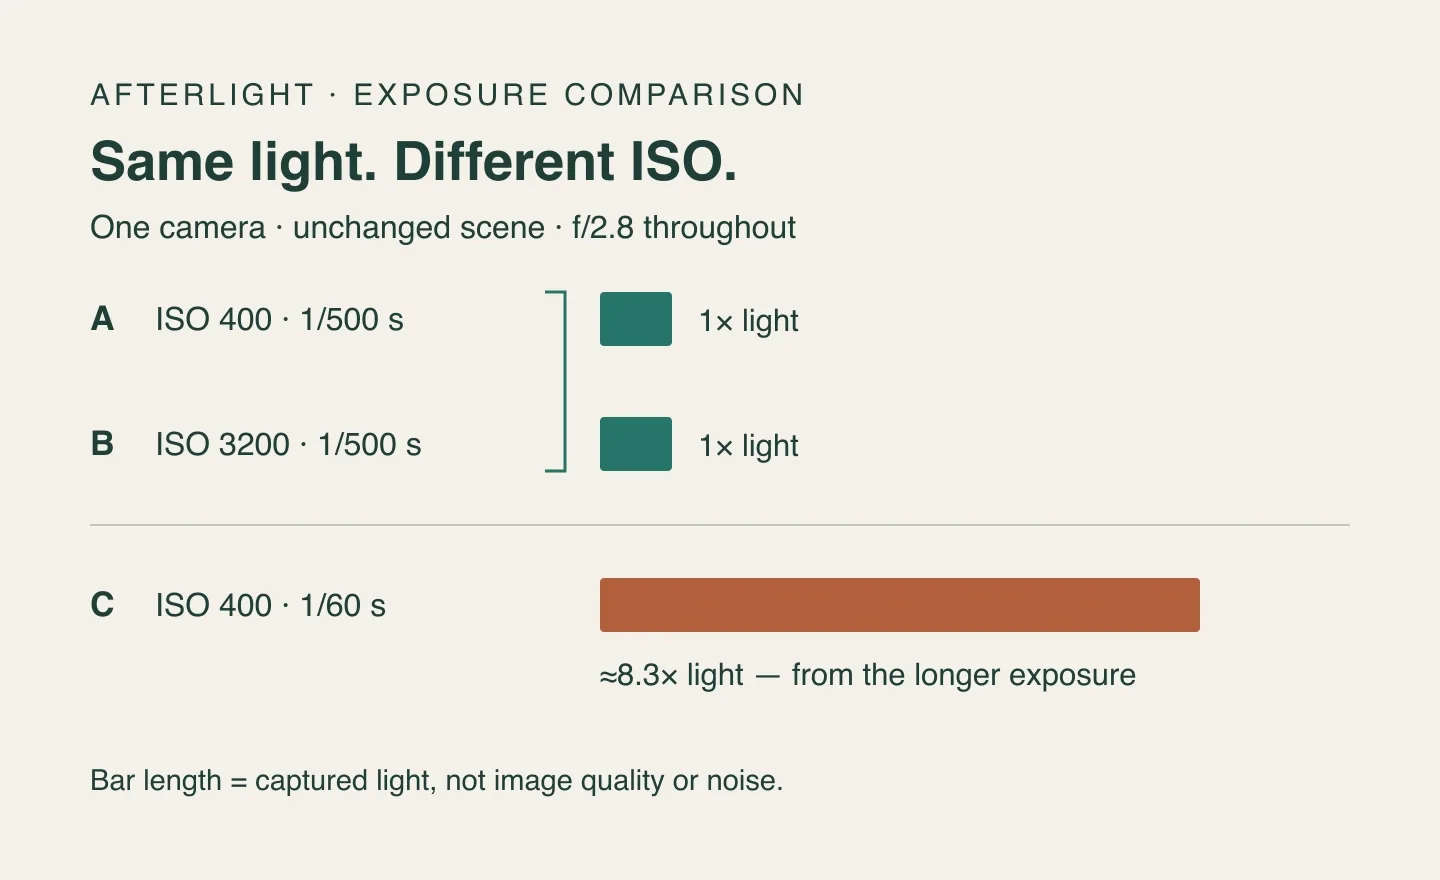
Original diagram: bar lengths show relative light collection for an unchanged scene and aperture. They do not predict image noise.
Comparing A with B asks whether raising ISO helps with the light you already captured. ISO 3200 is three stops above ISO 400, so start by brightening A by three stops in the RAW editor, then match the subject's brightness before judging noise.
Comparing A with C changes the light: 1/60 second collects about 8.3 times as much as 1/500. That longer exposure might improve the signal, but it might also blur the moving subject. A cleaner low-ISO photograph made with a longer exposure does not establish that low ISO alone caused the improvement.
What higher ISO can buy
Higher ISO can reduce the importance of noise introduced later in the camera's signal chain, particularly in deep shadows. Amplifying the captured signal before that noise is added can preserve a cleaner result than amplifying everything together afterward. The cost can be earlier saturation of bright values. The noise model and equal-exposure comparison in Hasinoff and colleagues' paper explain that tradeoff; its results are not a specification for every modern camera.
When matched RAW results change little across an ISO range, photographers call that behavior ISO invariance. It describes the result over a tested range, not a promise that the ISO setting does nothing.
There is photographic evidence for the highlight side of this choice. DPReview's own demonstration compares ISO 100 and ISO 3200 at the same 1/100 second and f/8. Its selectively brightened lower-ISO image retains sunset detail that its higher-ISO image cannot recover. The article also explains why an exposure-latitude test, which reduces captured light, answers a different question from its constant-exposure ISO-invariance test.
That example is a reason to investigate your camera's behavior, not a reason to shoot every scene at base ISO.
A real measurement shows why the ISO range matters
A camera's useful ISO range can include a change in how the sensor converts charge into voltage. Dual conversion gain allows a lower-noise readout mode with a different charge-handling limit; Aptina's technical paper explains the physical tradeoff. It does not make every ISO setting above the change equally useful, or make the transition identical between cameras.
Here is an example calculated from Bill Claff's published Nikon D500 measurements. Photographic dynamic range (PDR) is his measure of the span between the bright limit and a defined usable shadow threshold.
| ISO | Published average PDR | Calculated shadow-threshold improvement over ISO 100 |
|---|---|---|
| 100 | 10.68 stops | 0.00 stops |
| 200 | 9.79 stops | 0.11 stops |
| 400 | 9.17 stops | 0.49 stops |
| 800 | 8.17 stops | 0.49 stops |
Source: the eight-body sample table in Measurement and Sample Variation, rather than the separate repeated-measurement table. Claff identifies a conversion-gain change at ISO 400.
Following his shadow-improvement method, we add the ISO increase in stops to the change in PDR. From ISO 100 to 400, that is 2 + 9.17 − 10.68 = 0.49 stops. From 400 to 800, PDR falls by one stop while ISO rises by one: no further shadow-threshold improvement at the table's precision.
For this dataset, ISO 400 therefore buys shadow improvement over ISO 100; ISO 800 buys essentially none over 400 while reducing bright headroom. These are threshold measurements, not a prediction that every part of a finished picture looks half a stop cleaner. Nor do they establish your camera's optimum.
Make the choice in the scene
The ISO decision should follow the photograph's motion, depth of field and important highlights. Use this order:
- Keep the shutter speed and aperture the subject needs. If 1/500 and f/2.8 are necessary, compare ISO choices at those settings. Do not quietly switch to 1/60 to defend a lower ISO. Our guide to the shutter speed that avoids motion blur works out the first of those from how fast the subject moves.
- Name the bright detail you need. A face in a spotlight, a white shirt or a colored sky may matter; an isolated reflection may be expendable. Choose deliberately which detail deserves protection.
- Use the useful part of your camera's ISO range. Where matched tests show a worthwhile shadow benefit, higher ISO can be a good trade if the important highlights survive. Where the benefit has flattened, a lower setting gives you more reason to defer brightening to the editor.
Apply that to the moving subject: if the camera's tested behavior resembles the D500 table and ISO 400 retains the important highlights, raising to 800 has little measured shadow benefit. Keeping 400 and adjusting brightness later is reasonable. If ISO 100 retains a bright shirt that clips at 400, choosing 100 can still be worthwhile even though the table predicts a shadow penalty. The content of the frame settles that trade.
Lower ISO cannot promise to save a highlight whose captured signal already exceeds the sensor's capacity. If bright detail clips even at a suitable low setting, you may need less light exposure—and must reconsider the shutter or aperture constraint.
If you do not know your camera's behavior, start with an ISO that gives a usable rendition while watching important highlights. Avoid building an irreplaceable shoot around a large, untested RAW push. Establish the useful range when you can compare files calmly.
Check your camera without changing the question
A practical ISO comparison needs the same captured light and the same final brightness. Use a steady scene containing textured shadows and a bright area you care about. Fix the camera position, focus, aperture and shutter speed; turn off Auto ISO. Make repeated RAW pairs at the two ISO settings you actually want to choose between.
Keep the RAW format, bit depth and shutter mode consistent. Those controls matter in sensor characterization too: Photons to Photos' collection protocol explicitly specifies them and asks contributors to minimize noise-reduction processing.
In your editor, use the same white balance, profile, sharpening and noise-reduction settings. Disable automatic tonal adjustments and AI denoising for this comparison. Match a midtone's brightness, then examine both the shadows and the recoverable highlight detail. Check the intended output size as well as a close view: a difference that does not matter in the delivered picture need not dictate your settings.
If the low-ISO version has distracting bands or color patches after matching, that is a practical reason to favor higher ISO in that range. If shadows are effectively alike and the lower-ISO version preserves useful bright detail, you have a reason to brighten later. Repeat under stable light before attributing a small difference to the camera.
Record the ISO pair, RAW mode and result. A note such as “these two settings look alike in my finished output; the lower one retains the bright sign” is more useful in the field than calling the entire camera ISO invariant.
How this guide was made
This is a desk-researched guide with substantive AI assistance in research, calculation, diagram construction and drafting. Afterlight did not capture or process an original RAW test series. The exposure diagram is arithmetic; the D500 table is our calculation from attributed external measurements. The linked photographic comparison remains on its publisher's site. Our shooting procedure is a practical check, not a laboratory noise measurement.
← Back to the journal6 answers